This is part one of a two part series:
The Roller 4.0 Template Author Guide explains how to customize your
Roller theme by editing the page templates that define it. It tells you
how to use Roller's template language (Velocity
 ), what objects are available to your template code and what macros you can use to generate HTML and other content. You can download it here
in PDF form.
), what objects are available to your template code and what macros you can use to generate HTML and other content. You can download it here
in PDF form.
But the template guide does not tell you how to create a complete new
Roller theme, one that you can share with other Roller site admins.
That's a problem because I'd really like to see more themes, so I'm
going to rough-out some docs right here on my blog. In part one I'll
explain how to get started, what files you must provide and the new
Roller 4.0 Stylesheet Override feature. In part two I'll explain how to
create the new theme.xml
theme definition file that you must include in your theme. Let's roll.
Getting started
Just as before, a Roller theme is a directory of files, some page
templates and some "resource" files, which are typically images. So,
your first step in creating a new theme is to create a directory to hold
those files. Give it a simple one word alphanumeric name with no
spaces.
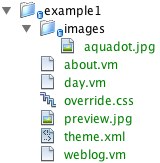
In the next sections, I'll explain what files you need and I'll show
some example templates from a minimal theme called "example1." This
example theme is made up of seven files, including three Velocity
templates (.vm files), a couple of images and a theme.xml
file. Here's the directory layout of example1.
Add Weblog and _day templates
A theme must have at least a weblog template with the name "Weblog"
and you'll find an example of one below. It's advisable to also have a
_day template, which is responsble for displaying one day's worth of
blog entries.
Here's the Weblog.vm file for the example1 theme, with
<html>

<head>

  <title>$model.weblog.name #if($model.permalink)

     : $model.weblogEntry.title #end</title>

  #showAutodiscoveryLinks($model.weblog)

  <style type="text/css">

  h1 { color:red; }

  h2 { color:orange; }

  a { color:orange; text-decoration:none; font-weight: bold; }

  </style>

  <link rel="stylesheet" type="text/css" media="all" href="$model.weblog.stylesheet">

</head>

<body>

  <table width="80%" align="center">

    <tr>

      <td valign="top">

        <h1>$model.weblog.name</h1>

        #set($rootCategory = $model.weblog.getWeblogCategory("nil"))

        #showWeblogCategoryLinksList($rootCategory false false)

        #set($pager = $model.getWeblogEntriesPager())

        #showNextPrevEntriesControl($pager)

        #showWeblogEntriesPager($pager)

      </td>

      <td valign="top">

        #showPageMenu($model.weblog)

        #showAuthorMenu(true)

      </td>

    </tr>

  </table>

</body>

</html>
And here's the corresponding _day template:
<h2 class="dayheading">$utils.formatDate($day, "MMM dd, yyyy")</h2>
#foreach($entry in $entries)
<h2 class="entryheading">
<img src=$url.resource("images/aquadot.jpg") />
<a href="$url.entry($entry.anchor)">$entry.title</a>
</h2>
<p>$utils.formatDate($entry.pubTime, "HH:MMa z") by $entry.creator.fullName</p>
<p>
#if($model.permalink)
$entry.displayContent
#else
$entry.displayContent($url.entry($entry.anchor))
#end
</p>
#end
You can read more about the Weblog and _day templates in the Roller
Template Guide, what I'd like to highlight now is a new 4.0 feature
called the Stylesheet Override
. Notice that the Weblog.vm file above includes some CSS styles, followed by a to a CSS file with URL $model.weblog.stylesheet
, that's the Stylesheet Override file. Let me explain.
Add a Stylesheet Override file
Roller 4.0's new Stylesheet Override feature makes it possible for
users of your theme to to change font, colors and other things without
having to edit any of the templates that define the blog. Instead, they
edit a CSS file known as the override file and that file is included in
the right places when the blog is displayed.
To support Stylesheet Override your theme must provide an 1) override
file, 2) an entry its theme.xml file and 3) must reference the override
file in the right place as shown above in the example Weblog.vm file.
When you create your override file, keep in mind that your theme
should stand-alone without the override file. The override file is for
specifying additional
styles above and beyond what your theme
already provides. It's perfectly OK and even a good idea for your
theme's override file to be empty, or containing a comment like this:
/* add your own custom CSS here */
Add other resources required by your theme
If your theme requires any static resources, i.e. images for the
banner or for the background, then include them in the theme directory
or its sub-directories. You must reference each one in your theme.xml
definition file.
Your theme must also provide a Preview Image
, an image
(recommended size ~350x400) that will be shown to users as they browse
possible themes within Roller. To satisfy this requirement, you include a
preview image file in your theme directory and reference it from your
theme.xml file.
In part 2, I'll explain how to create that theme.xml file with
references to all the tempate files and images that make up a theme.
In part one I explained how to create a theme directory and add the
required template and resource files. Now I'll wrap things up by
explaining what goes into a theme.xml
theme definition file and how to deploy your new theme.
Create a theme.xml file
The example1 theme that I discussed in part one has a preview image, a Stylesheet Override file, a weblog template, a _day
template, a custom template that displays an about page and a single image called aquadot.jpg
. The theme.xml
theme definition file below includes each of those items.
<?xml version="1.0" encoding="UTF-8"?>

<weblogtheme>

  <id>example1</id>

  <name>Example1: minimal theme</name>

  <author>Dave Johnson</author>

  <preview-image path="preview.jpg" />


  <stylesheet>

    <name>Override</name>

    <description>Stylesheet override</description>

    <link>override.css</link>

    <templateLanguage>velocity</templateLanguage>

    <contentsFile>override.css</contentsFile>

  </stylesheet>


  <template action="weblog">

    <name>Weblog</name>

    <description>Main template of weblog</description>

    <link>weblog</link>

    <navbar>false</navbar>

    <hidden>true</hidden>

    <templateLanguage>velocity</templateLanguage>

    <contentType>text/html</contentType>

    <contentsFile>weblog.vm</contentsFile>

  </template>


  <template action="custom">

    <name>_day</name>

    <description>Displays one day of entries</description>

    <link>_day</link>

    <navbar>false</navbar>

    <hidden>true</hidden>

    <templateLanguage>velocity</templateLanguage>

    <contentType>text/html</contentType>

    <contentsFile>day.vm</contentsFile>

  </template>


  <template action="custom">

    <name>About</name>

    <description>About this weblog...</description>

    <link>about</link>

    <navbar>true</navbar>

    <hidden>false</hidden>

    <templateLanguage>velocity</templateLanguage>

    <contentType>text/html</contentType>

    <contentsFile>about.vm</contentsFile>

  </template>


  <resource path="images/aquadot.jpg" />

</weblogtheme>
Now I'll break it down and explain each element.
Inside
The root element of the XML file contains some theme meta-data, an
optional stylesheet, one or more templates and zero or more resources.
Here's a run-down of the meta-data you must include in each theme:
- - the unique ID, by convention this is the same as directory name
- - name of the theme
- - name of theme author
- - path to image preview file, relative to theme directory
The override
Following the theme meta-data is the stylesheet declaration, including all of the required elements:
- - name of stylesheet
- - description of stylesheet
- - value used in stylesheet URI (e.g. ~http://example.com/../page/styles.css
)
- - in 4.0, this must be 'velocity'
- - path to theme file containing stylesheet, relative to theme directory
The elements
Next are the template elements, one for each page template. Each
element must have an 'action' attribute that declares on which action
the template will be invoked. Here are the possible values of the action
attribute:
- weblog: Each theme must have a weblog template, which displays the main page of the blog
- permalink: (optional) template which will be used when displaying individual entries
- searchIndex: (optional) template to be invoked to display search results
- tagsIndex: (optional) template to be used when displaying entries by tag
- custom: (optional) You can add as many custom templates as you want.
And here are the elements that must be included in a :
- - name of the template
- - description of template
- - value used in stylesheet URI (e.g. ~http://example.com/../page/mypage
)
- - true if page should be include in navigation menus generated by standard macros
- - true if page not to be called directly and only used as an include
- - in 4.0, this must be 'velocity'
- - the content-type to be generated by the template
- - path to theme file containing template, relative to theme directory
Including resources
After the template elements, we include the one element we need for the one image that is included in the theme. The path is relative to the theme directory.
Deploying your theme to Roller
To make your theme available to Roller, copy the theme directory into the Roller themes
directory. Restart Roller and watch the logs to see that your theme is deployed correctly. If there is an error in your theme.xml
file you should see an XML parser error in your roller.log
file. You can also turn on additional theme debugging by adding the following to your roller-custom.properties
override file.
log4j.category.org.apache.roller.weblogger.business.themes=DEBUG
If you want to share your theme with an even wider audience, then
consider contributing it to the Roller Support project, a site that
hosts additional themes that are not included in the official Apache
Roller release because Roller ships with only four core themes.
That's all
I think that covers all the bases. Let me know if it works for you or
what parts of the doc could be improved. I hope to get this into the
next rev of the Roller Template Guide (which you can get from the Roller download page
in PDF form).
Here's the example1 theme that I discussed in this post:
转自【http://rollerweblogger.org/roller/entry/how_to_create_a_roller
】
分享到:


相关推荐
Roller4.0的另外一套cas简单解决方案. 最近在使用roller4.0和cas的单点登录集成.中间碰到了很多很多的问题.也许我碰到的问题都是属于自己的技术不成熟,能力不够引起的.但是我想应该还是有很多人和我是差不多的吧.我...
rollerrollerrollerrollerrollerrollerrollerrollerrollerroller
Apache.Roller.4.0.Beginners.Guide.Dec.2009.pdf
PacktPub.Apache.Roller.4.0.Beginners.Guide.Dec.2009.rar
语言:中文 (简体) 自定义Element UI的所有设计令牌并实时预览 使用Element Theme Roller自定义全局变量和组件的所有设计标记,并实时预览新主题并基于新主题生成完整的样式包,以供您直接下载
NULL 博文链接:https://moving200x.iteye.com/blog/1749902
Apache Roller是一个全功能,多用户和组博客服务器,适合大型和小型博客网站。它运行一个Java Web应用程序应该能够运行在任何Java EE服务器和关系数据库。目前,Apache Roller能很好的支持Tomcat和MySQL。 本人用...
Safety evaluation of table liner for vertical roller mill by modified fatigue limit
Roller 是一个全功能的多用户博客平台,于2002年首发,采用Java语言开发,设计精巧,源代码是很好的学习资料。它支持weblogging应有的特性如:评论功能,所见即所得HTML编辑,TrackBack,提供页面模板,RSS ...
apache-roller-srapaapache-roller-srcche-roller-srccapache-rolaapache-roller-srcpache-roller-srcler-srcapapache-roller-srcache-roller-srcapache-roller-src
apache-rollapachapache-roller-srce-roller-srcer-srcapache-rolleapacapache-roller-srche-roller-srcr-srcapache-roapache-roller-srcller-srcapache-roller-src
apache-roller-src apache-roller-src apache-roller-src apache-roller-src apache-roller-src apache-roller-src apache-roller-src apache-roller-src apache-roller-src apache-roller-src
roller5 for tomcat a可以直接安置点的啊